Nowadays, we’ve got more time than ever to spend quality time with our loved ones. If you don’t feel like doing a craft store haul, but also want to take advantage of this time, this is the perfect list for you! Here are 10 crafts you can make with your little tots with items commonly found around the house.
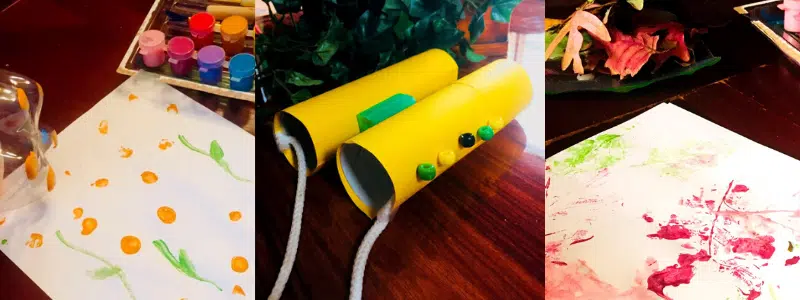
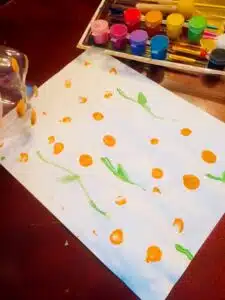
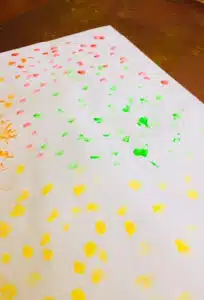
Flower Prints
Bring in Spring by using empty soda bottles or seltzer bottles to create a painted masterpiece.
 What You’ll Need:
 What You’ll Need:
- Freezer Paper
- Paint
- Empty soda/seltzer water bottle
Instructions:
- To help your little one make their own flower prints, first roll out some freezer paper.
- Have them dip the bottom of an empty soda bottle into some paint, then stamp on the paper.
- Rotate the bottle around to make even more petals!
Paper Plate Snail
Feeling sluggish? Try making your very own paper plate snails.
What You’ll Need:
- Paper Plate
- Paint
- Pipe Cleaner
- Googly Eyes
- School Glue
- Scissors
- Stapler
Instructions:
- First, have your little one finger-paint the paper plate.
- After, let the plate dry.
- Then, cut a snail head from the outside of the plate.
- Glue the eyes and add small pipe cleaners for the antennae.
- Then, use scissors to cut the paper plate around and around to make the snail shell.
- Once you’ve got everything cut out, staple the head and tail on and voila! Your own little snail!
Egg Carton Bowls
Don’t throw away that egg carton. Repurpose it for some family fun!
What You’ll Need:
- Egg Carton Paper
- Small Bowl or Cup
- Large Bowl with Cup of Water
- School Glue
- Food Coloring or Acrylic Paint
- Plastic Bag for Lining of Small Bowl
- Lace for Decorating (Optional)
- Paper Bag to Cover Table or Work Space
Instructions:
- Take the egg carton and break it into small pieces. Then, place the pieces into a large bowl with water.
- Let sit for about 10 minutes.
- Help your little tot mix it well until it becomes soft like paste.
- Have them add food coloring and glue. Use about 4 tablespoons of each and mix well.
- Take a small cup or bowl and line it with a piece of plastic bag. Cut a plastic bag large enough to fit the bowl and make sure it extends out of the cup.
- Place the mixture into the bowl and have your little one start shaping with their fingers. They should go around until you have a smooth shape of a bowl.
- Place the bowl in a sunny spot and let it dry for about 12 hours. Then, carefully take plastic off and turn it upside down to dry for 1 day.
- After the piece hardens, paint and decorate together!
Bubble Wrap Print
Bubble Wrap isn’t just for popping. Try letting your child use it to make this unique work of art.
 What You’ll Need:
 What You’ll Need:
- Bubble Wrap
- Scissors
- Paint
- Scrap Paper
- Paintbrush
- White Paper
Instructions:
- Cut a section of the Bubble Wrap about the same size as the sheet of white paper
- Select a few colors of paint to use with your little one. Fold the sheet of scrap paper in half to use as a palette for the paint.
- Squeeze out a small dab of each paint onto the paper and place next to the Bubble Wrap along with a paintbrush.
- Have your child paint the Bubble Wrap with the tools provided. (Finger-painting onto the Bubble Wrap is also allowed!)
- Once the Bubble Wrap is covered, place the white paper over the paint and press. Lift up the paper to reveal the cool Bubble Wrap print!
Caterpillar Suncatcher
Make room for one more crawler in the family! Try making this adorable caterpillar to decorate a window with.
What You’ll Need:
- Play-Doh lids (5 small and 1 large)
- Glue dots
- 2 small wiggly eyes
- Black permanent marker
- 2 black pipe cleaners
- Tape
- Scissors
Instructions:
- After gathering supplies, help your child attach the Play-Doh lids to each other with Glue Dots. The large Play-Doh lid will be your caterpillar’s head.
- When the caterpillar’s body is finished, stick 2 wiggly eyes to the large Play-Doh lid. Use the black permanent marker to draw a smile on the caterpillar’s face.
- Next, use scissors to cut 2 antennae for the caterpillar from a black pipe cleaner.Try to make them about 2 inches long. Stick them to the back of the large Play-Doh lid with Glue Dots.
- Use scissors to cut 10 fuzzy legs for the caterpillar from the remaining pipe cleaners (about 1 inch long). Bend the ends of both the legs and antennae to complete your caterpillar!
- Hang the caterpillars in the window by attaching loops of transparent tape to the back of the Play-Doh lids.
Coffee Filter Butterflies
Use those coffee filters in an innovative way by making these painted beauties.
What You’ll Need:
- Coffee filters
- Wooden butterfly bodies or twigs
- Glue gun
- Cord
- Paint (liquid watercolours, watercolour pucks etc.)
- Glitter glue
- Office supply stickers
- Branch or driftwood
- Beads
- Cooling racks
- Artificial stamen
- Scissors
Instructions:
- Have your child paint the coffee filters. It might be fun to try splatter painting, where you tap the brush, creating flecks of color.
- Allow your filters to dry overnight on your cooling racks. Once dry, add stickers if you would like to extend your designs.
- Fold your filters and glue them onto the back of the butterfly bodies, adding some stamen for antennae if you’d like. (There may need to be adult assistance for this portion to hold the fold down.)
- Loop the cord over the driftwood or branch, knotting it tightly and then lace your beads through the two pieces of cord, knotting the end several times.
- Attach your butterfly to the bottom with glue. Trim off any excess cord.
- Allow to dry and then hang it in your little one’s room!
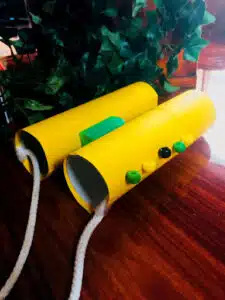
Toilet Paper Roll Binoculars
If your little one is seeking excitement within their daily schedule, this will definitely help quench their thirst for adventure. You could even try pairing this craft with a Virtual Adventure class offered here at Bubbles!
What You’ll Need:
- Two toilet paper rolls
- White glue
- Glue-dots
- Scissors
- String or ribbon
- Construction paper or butcher paper
- Optional: decorating supplies (markers, crayons, stickers, tissue paper!)
Instructions:
- Begin by connecting your toilet paper rolls with glue. If the binoculars are going to be played with a lot, use white glue or hot glue for a stronger hold. Wait for the glue to dry before continuing to the next step.
- Choose what paper you want to cover your binoculars in. Wrap the paper around the width of the binoculars and trim off the excess paper with scissors. Use glue dots to secure it around the rolls.
- Have your little one decorate the binoculars however they choose! You can paint them, color them with crayons or markers, collage with tissue paper, cover them in washi tape or stickers, and even bedazzle. There is no wrong way to do this step!
- If you want to be able to wear the binoculars around your neck, make sure to add a strap.
- Measure and cut the string.
- Then, use scissors to cut a small hole on the outside edge of each roll about a 1/2 inch from the top.
- Take one end of your string and thread it through the hole you made. Tie a knot to secure. Repeat with the other side of the string.
- Go on a safari!
Tissue Box Monster
It turns out that tissue boxes have more purposes than we may have thought. If your child favors the Cookie Monster (or if they themselves are a Cookie Monster), this is sure to brighten their day.
What You’ll Need:
- Tissue Box – preferably one with a round opening so that it looks more like a mouth but a square opening could work too!
- Colored acrylic paint – we used two different colors, one for the outside of the box and one for the inside
- White acrylic paint
- Googly eyes – extra large ones can be found at Michaels, different sizes work best and small ones are needed for the purple box.
- White cardstock
- Large pom poms
- Black sharpie or marker
- 1 popsicle sticks (optional for the purple monster)
- Craft knife (optional – adults only)
- Glue – hot glue is always going to work best when working with large googly eyes and pom poms, but you can also use an extra-strong glue like this one. Just make sure to let it thoroughly dry and press and hold for the glue to take.
Instructions:
- Pull out any plastic inner lining inside the tissue box before you start.
- Paint the outside of the tissue box with white to prime the box. Adding white will make sure the design of the tissue box doesn’t show through the paint.
- Once dry, have your little one paint the outside of the tissue box with colors of their choice. Feel free to paint the inside as well.
- Outline around the “mouth” of the monster (the opening of the tissue box) with a black marker. This will make the mouth pop more.
- Then, cut 1 popsicle stick in half. Have your little one paint the pieces and let them dry.
- Glue 2 small googly eyes to the sticks. Make a small slit mark at the top of the box with the craft knife (adults should help with this part) to push the sticks in.
- Glue large googly eyes to the top of the tissue box. Give your tot the freedom to add one, two, three or more eyes!
- Cut out large teeth from paper or white cardstock. Glue the teeth to the inside of the tissue box mouth.
- Feel free to let your tot give your monsters a little more character by gluing some large pom-poms or other decorations to the outside of the tissue box.
Leaf Stamps
Now is a great time to appreciate the outdoors. Help your child utilize their creativity in order to make these snapshots of nature stand out.
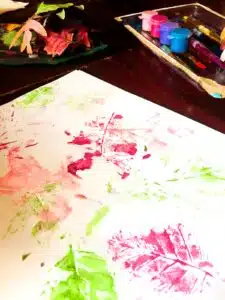
What You’ll Need:
- Real Leaf
- Paper or fabric
- Tempera or poster paint (for paper)
- Fabric paint or acrylic paint (for fabric)
- Paint brushes
- Mat or newspaper
Instructions:
- Collect leaves of various shapes and sizes. Both fresh and fallen leaves will work.
- Cover your work area with a mat or with newspapers. Prepare different colors of paint on a palette. Add just enough water to make the paint spreadable but not runny. Cut your paper or fabric to the desired size.
- Take one leaf and flip it so that the underside is facing up. Have your kiddo paint the entire surface of the leaf.
- Help them carefully place the leaf, painted side down, on the paper or fabric. Press firmly for several seconds to transfer the paint.
- Remove the leaf to reveal a beautiful leaf print!
- Repeat the process using different colors and other leaf shapes to fill the paper or fabric with leaf prints. Once the masterpiece is finished, allow the paint to dry completely.
Floral Fairy Lights
Travel to a faraway land of fairies and pixie dust—all without even leaving your home! Your little tot is sure to enjoy adding some magic to this classic decoration.
What You’ll Need:
- Egg Carton
- Paint (2 colors)
- Glitter
- Glue
- Scissors
- Paint
- A Set of Plain Fairy Lights
Instructions:
- Cut out your egg carton cases. Try cutting “petal shapes” along the lines of the little grooves on the carton. These then become your flowers.
- It’s time for your little one to paint!
- Let dry in the sunshine.
- Add some PVA glue on the inside of your flowers – but not the center (you will cut a hole here later).
- Have your little tot add glitter (“pixie dust”) from one cup to the next.
- Dry some more.
- With nail scissors cut small holes into the centers and pop your egg cups over your fairy lights.
- Hang them, switch them on, and enjoy!
Now it’s time to show off your art! Tag us on Facebook or Instagram so we can see what you created! Special thanks to Miss Chamaya for pulling together this list of fun kids art projects!
